

A Shortcut Virus is one of the viral spread that causes a lot of issues by making the files inaccessible. It is a kind of Trojan that hides all your files and folders by replacing it with the shortcuts which exactly looks like the original file.
If you are trying to open any of the shortcut files, it will start running the malware which duplicates and doubles the virus which infects your system/device. It may lead someone to steal your personal data and may reduce system performance by executing multiple processes.
Most of the time, the shortcut virus affects the portable/transferable devices such as USD Flash drives/Pendrive, External Hard Drive, Memory Card and related items. Also, it can get transferred to the computer by making some functions like autorun, moving the files, copying the files and so on.
Are you feeling safe with your Antivirus program? But sometimes the antivirus programs don’t detect the devices infected by shortcut viruses which allow the system to get infected. Also, the steps involved in removing the shortcut virus is quite simple and painless. It doesn’t need any coding knowledge or experienced computer operator.

Check out the below steps to remove the shortcut virus from an external device like Pendrive, hard disk or other removable storage devices.
The above mentioned are the two major classifications that we should know to recover the device affected with shortcut virus. Either it should be a personal computer with the Windows operating system else it should be some external hard drives that support with additional storage option.
The time needed: 15 minutes.
How to Remove Shortcut Virus in an External Device / USB / Pendrive?
Steps involved in Removing the Shortcut Virus from an External Device / USB / Pendrive are,
- Attach the Infected Device
Switch on your computer and attach the Infected device. It may be a Pendrive, external hard drive or other storage devices that support the USB port.
- Open File Explorer
Open the file explorer in your system after attaching the external drive which is affected. Keyboard shortcut to open file explorer is Windows Key + E. Open My Computer (or) This PC.
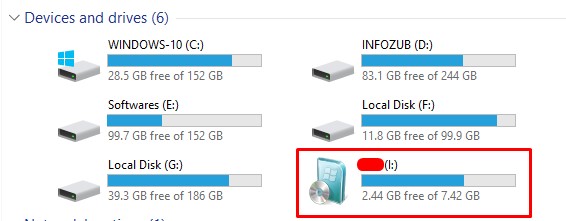
- Check the Drive
You can open the drive and check whether that’s the exact drive or not. Once confirmed, make a note of the drive letter. For example, C Drive will be mentioned as (C:)
- Open Command Prompt
Open the command prompt as an Administrator. There are 2 different options and you can choose the one easy for you to execute it.
i) Windows key + R -> Type “cmd” & press enter.
ii.) (Windows 10 Users Only) Press Windows Key & type “Command Prompt“, right-click and choose “Run as administrator”. Allow the program by clicking “yes”.
iii.) Windows key + X to open the Power User Menu & select Command Prompt (Admin). Sometimes it will show PowerShell and you can choose Windows PowerShell (Admin).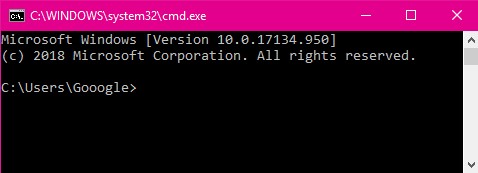
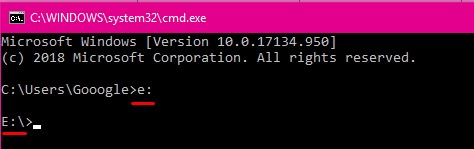
- Navigate to the Affected Drive
Inside the command prompt, navigate to the affected drive location. For example: In Step 1, my external device is shown as I: Drive. So you can navigate to the affected drive by merely entering the drive letter followed by “:” and press “enter key” as mentioned in the below Image.
- Delete all shortcuts
Now you can delete all shortcuts in the affected device with the below command:
del *.lnk
It will delete all the shortcuts even if you have placed something meaningful.
Note: An LNK file is a shortcut or “link” used by Windows as a reference to an original file. - Restore all files and folders
Now you want to restore all the files and folders on the affected device.
attrib -s -r -h /s /d *.*Note: The attrib command is a native Windows function that alters the attributes of a particular file or folder.
i) -s removes the “system file” status from all matching files and folders.
ii) -r removes the “read-only” status from all matching files and folder.
iii) -h removes the “hidden” status from all matching files and folders.
iv) /s makes the command recursively apply to all files and folders in the current directory and all subdirectories, basically the entire device in this case.
v) /d makes the command apply to folders as well (normally attrib only handles on files).
vi) *.* means all file names and folder names should be considered a match.