
Installing WordPress is a great challenge in older days. But now everything came under a single click with the automation tools like One-Click Installer. Even the hosting provider will give you support and guide until WordPress Installation. After installing WordPress, everything you should know is how to install a theme in WordPress to create an attractive website look. All you should know after installing WordPress is how to install a WordPress plugin. WordPress plugins allow you to add new features such as third party integration, pop up form, contact form, slideshow, drag & drop editor and so on.
There are hundreds and thousands of free WordPress plugins exclusively for WordPress websites. You should also know the most needed WordPress Plugins for a website.
Here is the complete step by step guide to install and activate a WordPress plugin.
Table of Contents
How to Install Plugin in WordPress?
Installing a WordPress Plugin is very easy and simple. Installation and activation of a plugin don’t have any complications. But it can be done using various methods such as using WordPress Plugin Search, Uploading a WordPress Plugin and manually install a WordPress plugin using FTP Access.
✯ Using WordPress Plugin Search
WordPress plugin search is one of the best options for easy search and integration. Also, once the plugins are in the WordPress directory then people will get some trust in the plugin as well.
When you search plugins in the WordPress Plugin search, you can even compare and find the trusted plugin for your website.
Installing and activating an outdated or incompatible plugin may leave you in trouble. Check our guide on how to choose the right plugin for your website.
Once you found the perfect plugin for your requirements, you can click on the Install button on the right of a Plugin.
Once installed, you will see an option called Activate the Plugin. Click on Activate option shown on your screen else go to Plugins » Installed Plugins.
Under the installed plugin, you will see multiple options like Activate, Delete. Click on Activate to activate the WordPress Plugin.
✯ Using WordPress Plugin Upload
WordPress Plugin Upload is another possible way to install and activate the plugins. Some of the WordPress plugins are only available as a premium version for which you should pay the developer.
Most of the companies develop WordPress plugins themselves to satisfy their requirements. You cannot find those plugins in the WordPress plugin search and you should go with this method.
Follow the below steps to install a plugin using WordPress Plugin Upload option,
- WordPress Plugin file will be in a Zip format.
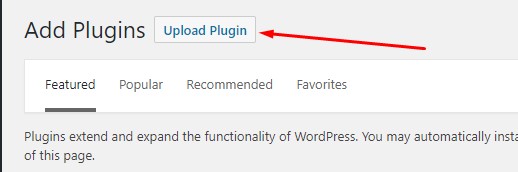
- Log in to your website WordPress dashboard and navigate to Plugins » Add New
- You will see an option Upload Plugin, click on it.
- Click on the Choose File button and choose the plugin file that you want to Install.
- Once you selected the WordPress Plugin file, click on the Install now button to upload and install the plugin.
- After installation, you will see an option as Activate the Plugin. Click on Activate option shown on your screen else go to Plugins » Installed Plugins.
- Under the installed plugin, you will see multiple options like Activate, Delete. Click on Activate to activate the WordPress Plugin.
✯ Using FTP Access
Installing a WordPress plugin using FTP access is another alternative way. To Install and activate the WordPress Plugin using FTP Access, you should have FTP Access & WordPress dashboard access with enough permissions.
- Login to the Website through FTP and navigate to public_html » wp-content » plugins. It may vary based on the website structure.
- Upload your WordPress Plugin file inside the Plugin directory and extract it.
- Once done, you can log in to WordPress dashboard and navigate to Plugins » Installed Plugins
- Under the installed plugin, you will see multiple options like Activate, Delete. Click on Activate to activate the WordPress Plugin.